Create and deploy a project
After engineers configure TapData connections, tasks, and APIs, they can package those resources as a project, export the configuration, and deploy it to another environment. Deployment can run automatically through GitHub Actions or manually through file export and import.
This guide covers both automated deployment and manual import/export. If you plan to use GitHub and GitHub Actions, first complete Set up an automated deployment pipeline. If you only need manual import/export, follow this guide and see Appendix: Manually import configuration.
Example scenario
This guide uses a common real-time data warehouse scenario. A team synchronizes data from an Oracle source database to a Doris warehouse. The team has already verified wide-table synchronization tasks and an external API in the development environment. The next step is to promote the same configuration to system integration testing (SIT), and then to production.
The following workflow shows how to create a project, export configuration, deploy automatically, and publish manually when needed.
Use the same connection names across environments. During automated deployment, TapData matches connection names to GitHub Secrets and Variables, then injects the real address, username, and password for the target environment. Use connection names that contain only letters, numbers, and underscores, such as oracle_source.
Step 1: Create a project and select resources
Package the team's tasks and API as one project. The project becomes the unit that you export, review, deploy, and roll back.
-
Log in to the TapData console. In the left navigation pane, choose Advanced Settings > Project Management.
-
At the top of the left panel, click + to create a project. Enter a project name, such as
dw-pipeline. Use the same name as the GitHub tenant repository when possible. -
In the middle panel, switch between Migrate Task, Transformation Task, and API. Select
CRM_TO_DW,ORDER_TO_DW, andcustomer-api, then click Add selected > to move them to the selected list.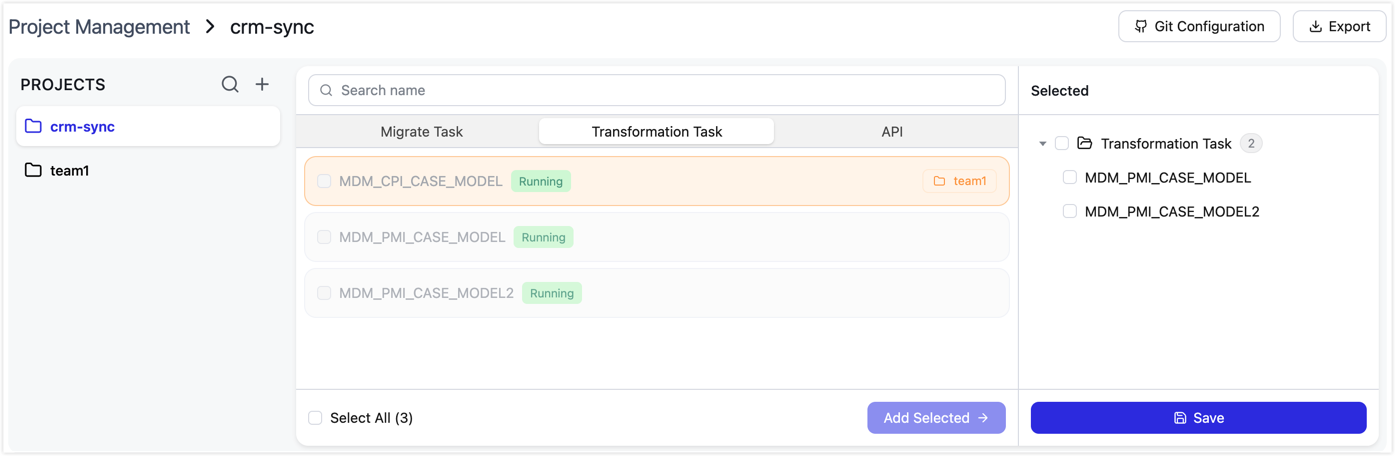 tip
tipWhen you select tasks or APIs, TapData automatically includes dependent connections. In this example,
oracle_sourceanddoris_targetare included automatically. -
Click Save.
Step 2: Connect the Git repository
Connect the TapData project to the GitHub tenant repository. After the connection is configured, exports can be pushed to the repository and opened as Pull Requests without downloading and uploading files manually.
-
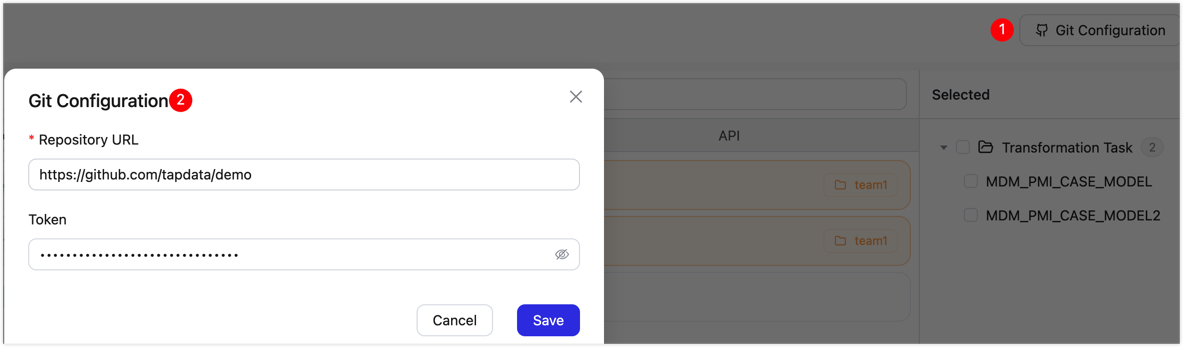
In the upper-right corner, click Git Configuration.
-
In the dialog box, enter the GitHub tenant repository URL and personal access token.
-
Click Save.
If you do not want to integrate with GitHub, skip this step. In Step 3, choose file export and import the archive manually.
Step 3: Export the configuration
Export the project configuration from the development environment and submit it to GitHub for later deployment.
-
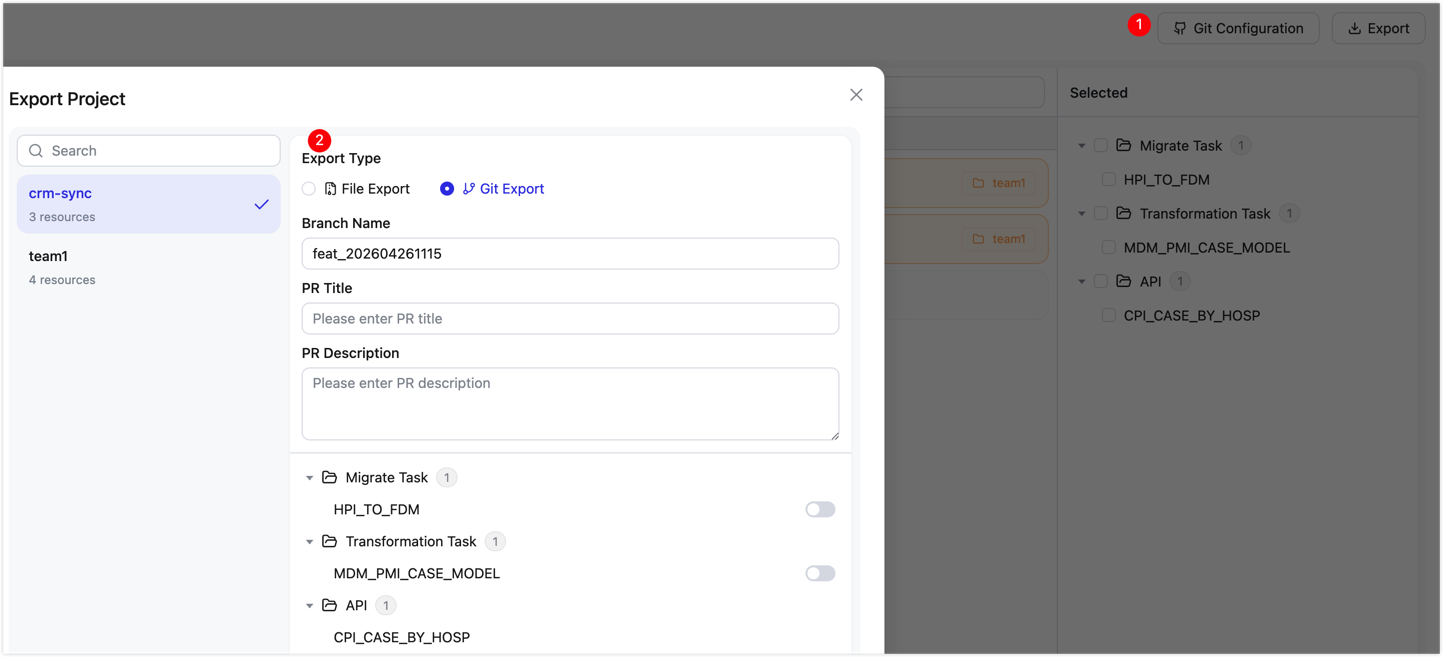
On the Project Management page, click Export in the upper-right corner. In the export dialog box, select the project to export.
-
Select an Export type.
-
Git Export: Available after a Git repository is connected. TapData pushes the configuration files to GitHub and creates a Pull Request. Enter the following information:
Field Description Branch name The system generates a branch name that starts with feat_and includes a timestamp. You can edit the branch name.PR title A short summary of the change for review. PR description Optional. Describe why the change is needed and what it affects. -
File Export: Downloads the configuration as a compressed archive. Use this option when Git integration is not configured. For the import steps, see Appendix: Manually import configuration.
-
-
In the resource list, review the tasks and APIs to be exported. If the list is correct, click Confirm Export.
tipConnection credentials are masked during export. Database passwords and other sensitive fields are not written to the configuration files. Enable Rerun only when the target environment needs the task to run a full synchronization again, for example after adding source tables or changing primary keys. For routine changes, keep the default setting so tasks continue from the last checkpoint.
Exported file structure
Exported configuration is organized as a directory. Git export commits this directory to the repository. File export packages it as an archive.
{project-name}_tapdata_export/
├── GroupInfo.json          # Project metadata: project name, Git repository, and resource list
├── Connection/             # Connection configuration, including dependencies of tasks and APIs
│   ├── {id}_Connection_Config.json    # Connection parameters with sensitive fields masked
│   └── {id}_Connection_Metadata.json  # Table metadata for the connection
├── Task/                   # Task configuration
│   ├── {id}_MigrateTask.json          # Data replication task
│   └── {id}_SyncTask.json             # Data transformation task
├── API/                    # API configuration
│   ├── {id}_Module.json               # API definition, including path, fields, and query logic
│   └── MetadataDefinition.json
└── User/                   # User and role information for restoring operator context
    ├── Users.json
    ├── Roles.json
    ├── RoleMappings.json
    └── UserIdEmailMap.json
Notes:
- Connections: TapData detects and exports connections based on task and API dependencies. You do not need to select them manually.
- Sensitive information: Usernames, passwords, and other credential fields are cleared during export. In automated deployment, TapData injects real values from GitHub Secrets and Variables. In manual import, update the connection values after import.
- User data: The
Userdirectory contains operator account and role information so the target environment can restore the user context. Passwords are stored as hashes and do not include plaintext values.
Step 4: Optional: Merge the Pull Request to deploy to development validation
If the dev environment is configured, merge the Pull Request in GitHub to deploy the exported configuration to the development validation environment. This step verifies that the configuration files can be imported before you promote them further. If your process only uses SIT and production, skip this stage and adjust the tenant deployment workflow accordingly.
- In the GitHub tenant repository, open the Pull Request created by TapData. Review the exported configuration, then click Merge.
- The merge triggers the GitHub Actions
TapData Deployworkflow and deploys the configuration to the development validation environment. - If the preview shows changes to connections, tasks, or APIs, approve the
deploygate on the Actions page. - After deployment finishes, sign in to the development validation TapData environment. Verify that
CRM_TO_DW,ORDER_TO_DW, andcustomer-apiwere imported correctly and that the connections pass the connection test.
Step 5: Create a tag to deploy to SIT
After the configuration is ready for testing, create and push a Git tag to trigger deployment to the SIT environment.
git tag v1.0.0
git push origin v1.0.0
After the tag is pushed, GitHub Actions starts the SIT deployment. If the preview shows changes to connections, tasks, or APIs, approve the deploy gate before the import continues.
When deployment finishes, complete business validation in the SIT environment. Check functional correctness, data volume, synchronization latency, and other acceptance criteria. If validation passes, continue to production deployment.
Step 6: Trigger production deployment manually
After SIT validation passes, deploy the same tag to production. Using the same tag ensures that production receives the exact configuration that passed testing.
The official tenant template includes dev, sit, and lpt as manual deployment options by default. To deploy to prod, add prod to the tenant workflow options first. If your process includes performance testing or user acceptance testing, deploy to lpt or aat before production in the same way.
- In the GitHub tenant repository, go to Actions, and select
TapData Deploy. - Click Run workflow. For Branch, select the tag, such as
v1.0.0. For Target environment, selectprod. If you need to deploy to performance testing or user acceptance testing first, select the configuredlptoraatenvironment. - Click Run workflow. If the preview shows changes to connections, tasks, or APIs, approve the
deploygate on the Actions page. - After deployment finishes, sign in to the target TapData environment. Verify task status and API availability, then complete the production release.
Roll back a deployment
If a deployment does not behave as expected, such as when a task enters an abnormal state, roll the environment back to a previous stable tag.
- In the GitHub tenant repository, go to Actions, and select
TapData Rollback. - Click Run workflow. Enter the target environment, such as
prod, and the tag to roll back to, such asv0.9.0. - The rollback workflow stops the current tasks, unpublishes active APIs, clears the existing configuration, imports the configuration from the selected tag, and restores the runtime state for tasks and APIs that were active before rollback.
- After rollback finishes, sign in to the target environment and verify the task status and API availability.
Rollback affects only the selected target environment. Other environments are not changed.
FAQ
Q: How does project import handle existing resources?
Both automated deployment and manual import update existing connections, tasks, and APIs in the target environment based on the imported configuration. Unchanged resources remain unchanged. Resources that do not exist in the target environment are created.
With GitHub-based deployment, real connection addresses, usernames, and passwords for new connections are injected from the target Environment Secrets and Variables based on connection names. With manual import, credentials are not injected automatically. Update or complete the connection values in the target environment after import.
Q: Why does GitHub Actions report Could not find reusable workflow?
- Check whether the Worker repository visibility is Internal.
- Check whether the Worker repository path in the tenant workflow has been replaced with the real value.
Q: The deployment succeeded, but the database password was not injected. What should I check?
- Check whether connection credentials are configured in the target Environment Secrets or Variables, not repository-level Secrets.
- Check whether the variable names exactly match the connection names in TapData after applying the naming rules.
Q: What should I do if the import script fails?
- Check whether
{ENV}_TAPDATA_ACCESS_CODEis configured correctly and is still valid. - Open the GitHub Actions logs, find the error returned by the TapData API, and troubleshoot based on that response.
Appendix: Manually import configuration
Use manual import when GitHub integration is not configured or when you need to import a specific exported version directly into a target environment.
-
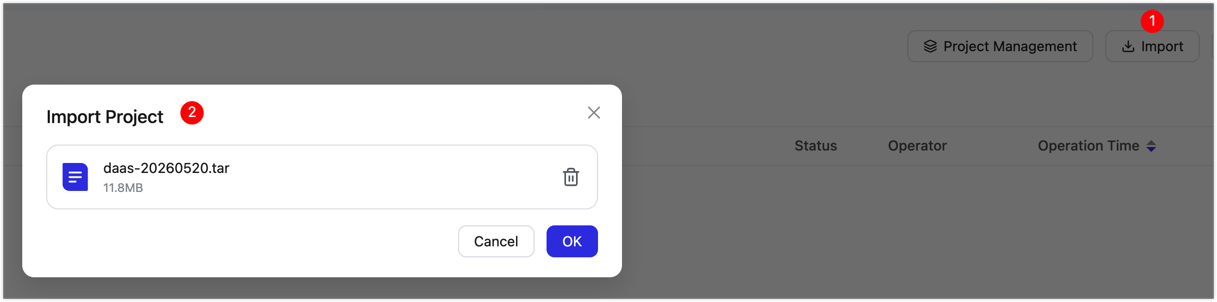
On the Advanced Settings > Export/Import page, click Import.
-
Upload the archive exported from the development environment.
-
Select a conflict handling policy, such as Skip or Update existing configuration.
-
Click OK. TapData validates the file format and shows an import preview, including the affected connections, tasks, and APIs. The following image shows the import preview page, which is used to confirm the resources to be added or updated.
-
Review the preview and run the import.
-
After import finishes, sign in to the target TapData environment. Update the real connection addresses, usernames, and passwords, test the database connections, verify task status and API availability, and then start the tasks.